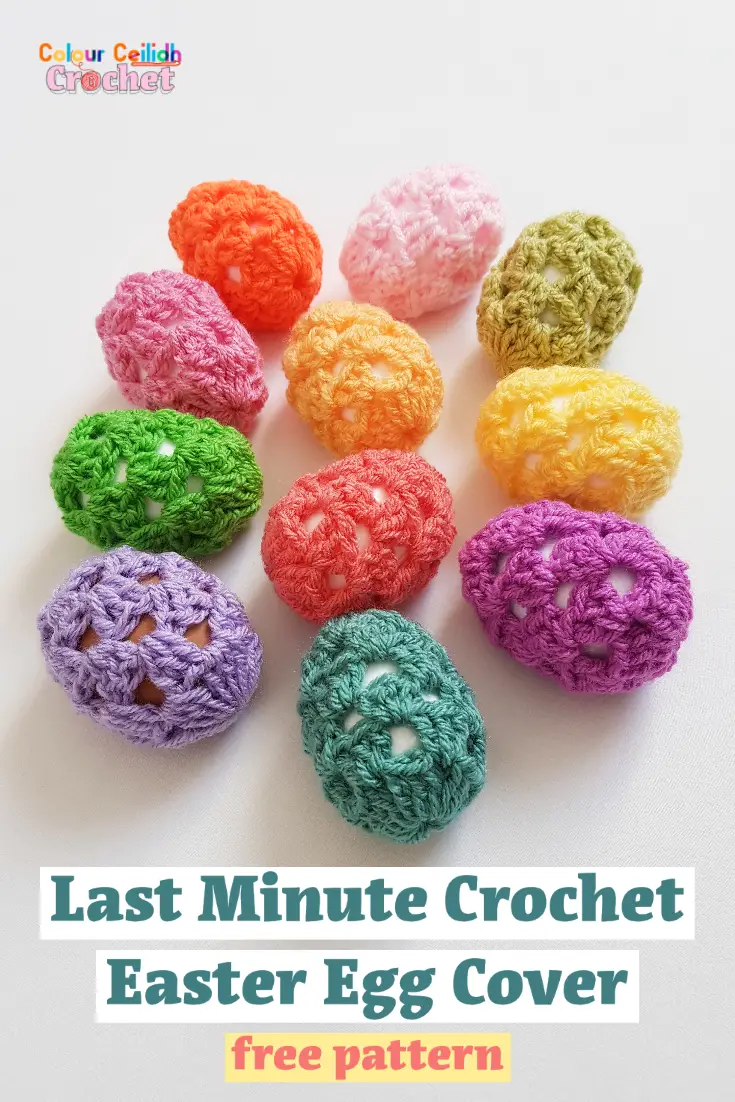
This last minute crochet Easter egg cover is made with the granny stitch using a large hook for a quick and satisfying result. The crochet covers are removeable, reusable, pack flat for storage and are a no dye option. I really wasn’t up for dyeing Easter eggs this year!..
This post contains affiliate links to products. I may receive a commission for purchases made through these links.
This one pattern fits all. I mean, I used it for everything I could find at home, small, medium and large brown eggs from the mixed weight and sizes egg box from my fridge and some children’s polystyrene eggs.
When I got the white polystyrene eggs out, my 6-year-old daughter asked me if I was going to paint the eggs. I said that my crochet hook will be my paint brush and the yarn will be my paint. She thought about it for a moment and ran off to play ;D
Notes
There’s only 2 rounds and 4 short rows. There’s no color changing after each row, only one yarn end to weave in and no single crochet stitches to slow you down.
We’re going to create an opening or a slit a the back of the Easter egg cover to fit the eggs through. Later you’ll simply turn your eggs over so that they sit on the slit to hide it away. At the same time, the slits/ openings stabilise your eggs for your Easter displays and prevent them from rolling off.
You can have a look at my video to see them in greater detail and how I use them for various sized eggs. [link coming up]
Materials & Skills Needed
You only need to know how to make a slip knot, a chain, a single crochet (just one) and a double crochet for this tutorial, so it’s perfect for a beginner looking for an easy Easter project.
You will need: a 6 mm/ J crochet hook, some DK/ 3/light worsted /8 ply yarn and scissors. The YARN I used is Stylecraft Special DK – they have a great selection of colors.
How To Crochet Easter Egg Covers
Here is my last minute crochet Easter egg free pattern – tutorial.
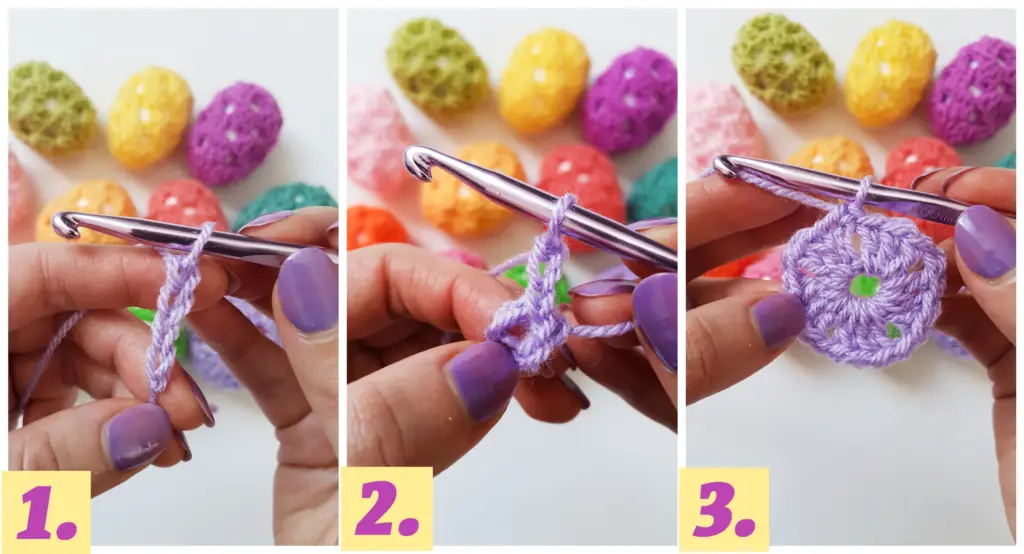
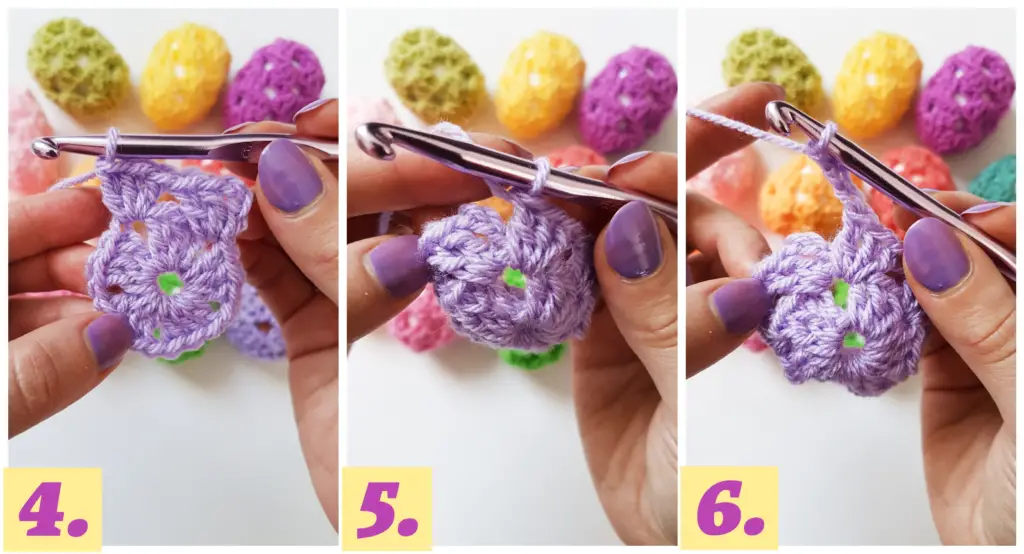
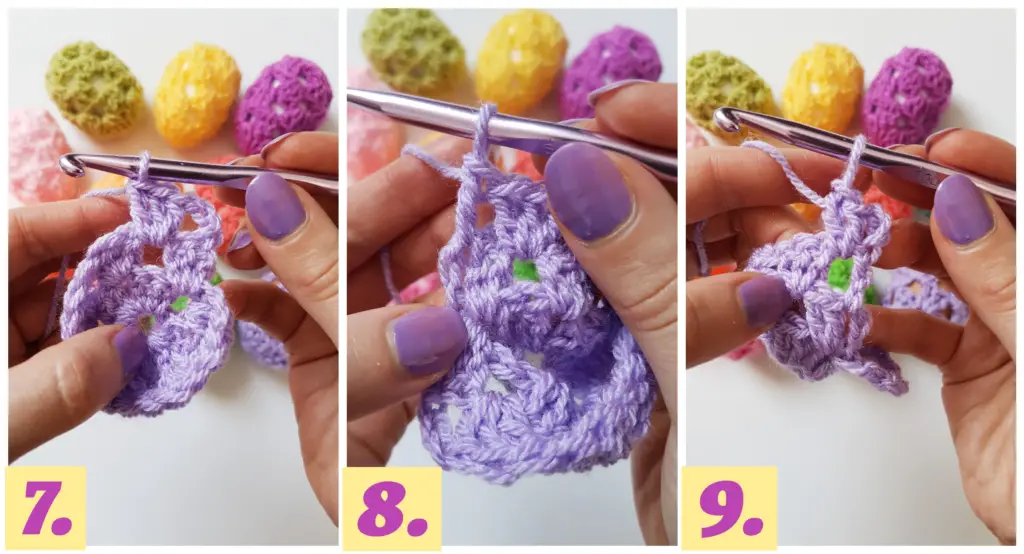
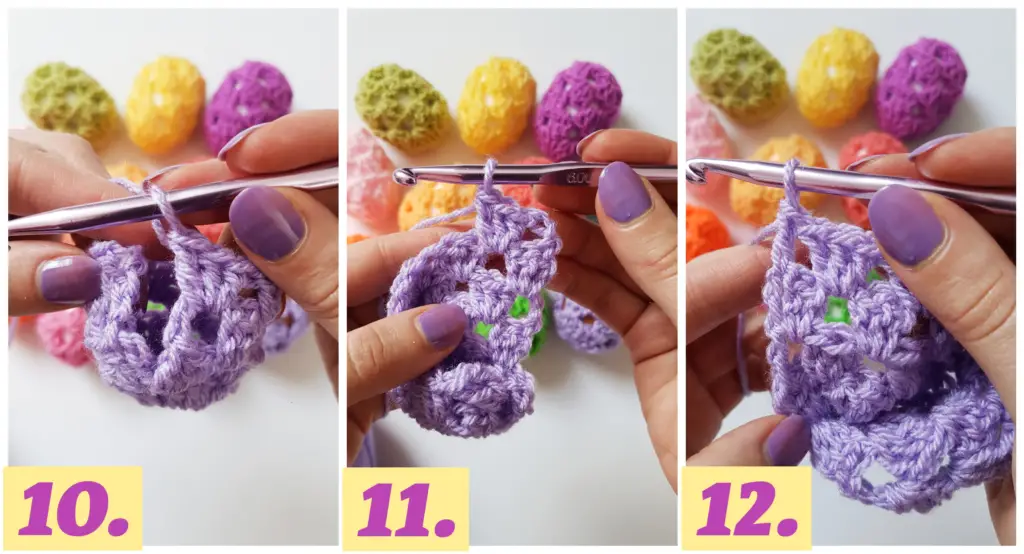
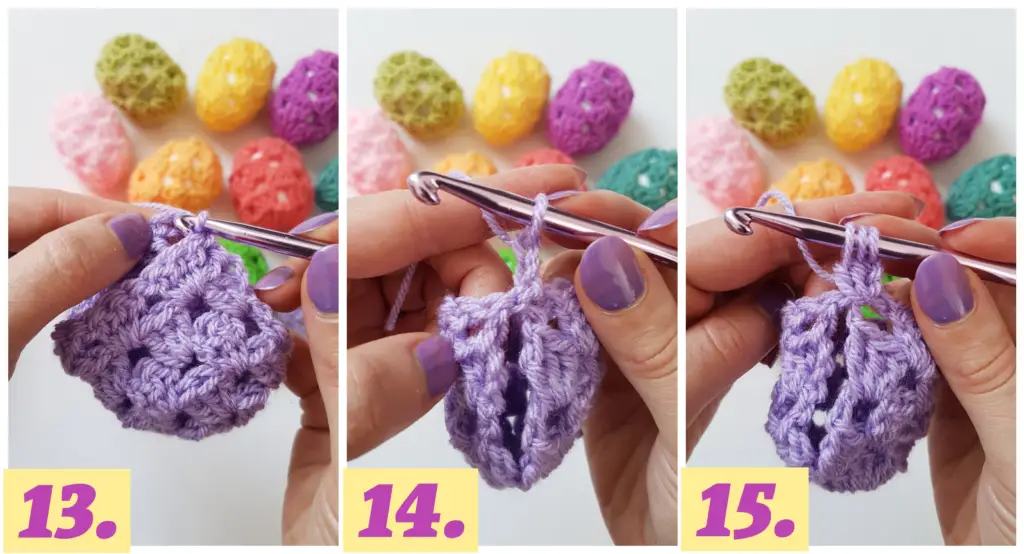
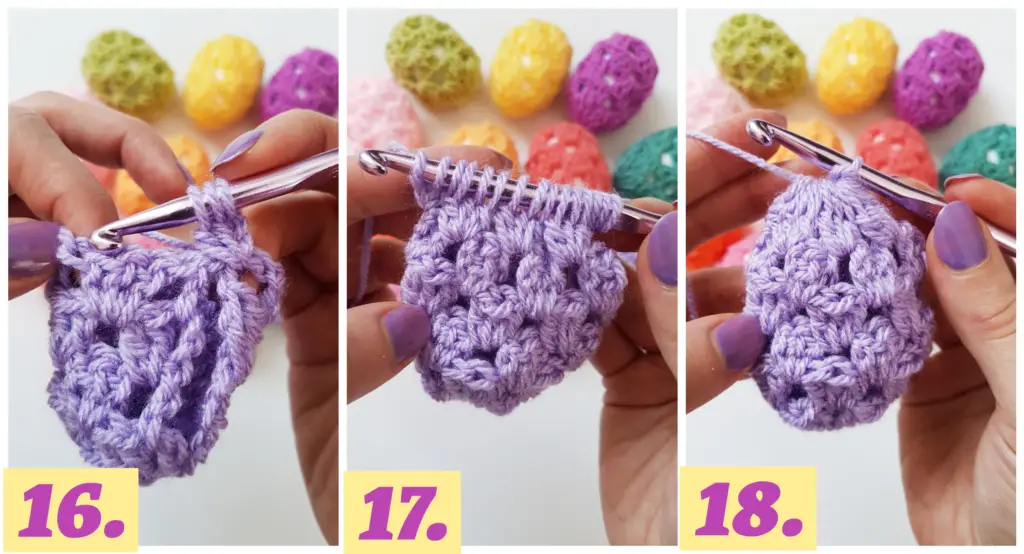
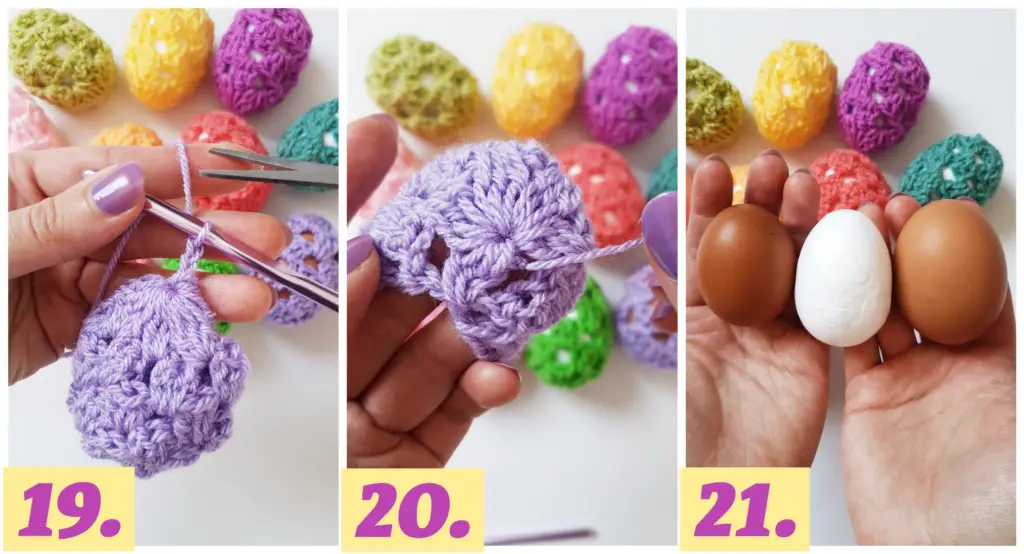
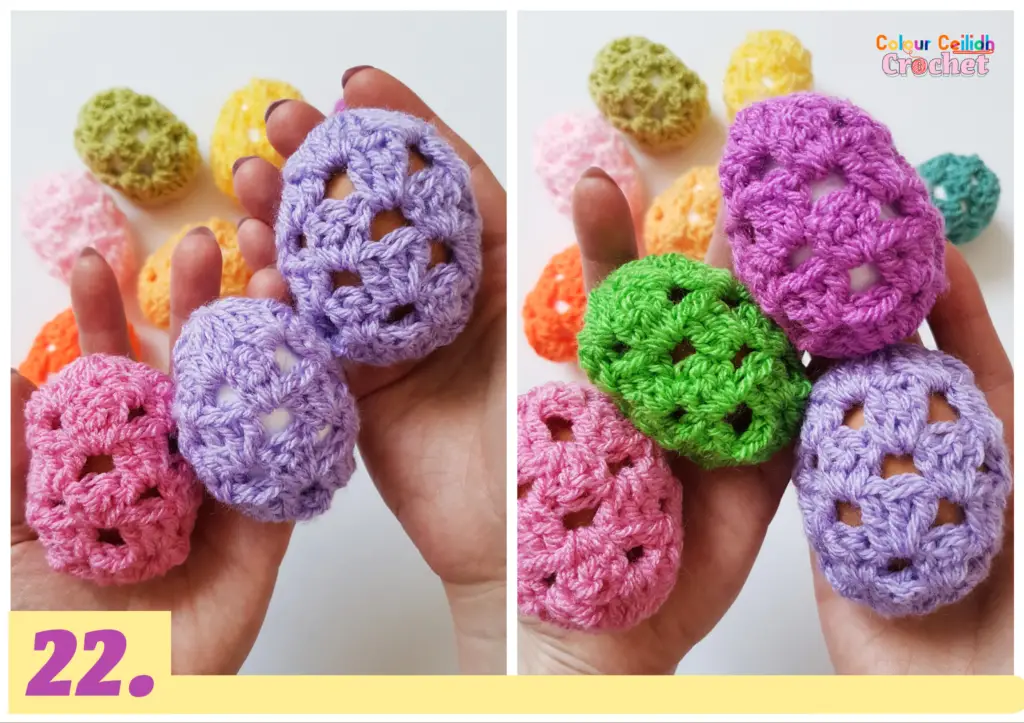
1. Make a chain 4. 2. Slip stitch into the first chain to form a ring. Rnd 1 – chain 3 (counts as double crochet). 3. In total make 5 clusters of 3 double crochet stitches into the ring. Separate each cluster by a chain 1 and connect with a single crochet to the top of chain-3.4. Row 2 – chain 3 (counts as double crochet). Make clusters of 3 double crochet stitches into every space around with no chains in between. 5. Make a second cluster in the same space where you started. 6. Row 3 – chain 3, turn.7. Crochet a 3 double crochet stitches cluster into the next space and every space around. 8. End with a double crochet made into the space between the first and second double crochet stitches from the last row, turn. 9. Row 4 – chain 3 and make 2 double crochets into the same space. Make 3 double crochet clusters into every space all around .10. Don’t forget the last space, turn. 11. Row 5 – chain 3 and 3 double crochet clusters all around into every space. 12. End with a double crochet made into the space between the first and the second double crochet stitches from the last row.13. With the row 5 complete it’s time to make a slip stitch into the top of chain-3. 14. Rnd 6 – chain 2. 15. We’re going to make 15 double crochet stitches joined with one loop over 5 spaces, starting with this space on the right where we made a chain 2. So yarn over, insert the hook and pull up a loop as usual for a double crochet stitch, but only pull through 2 loops on the hook once and stop, keeping one loop on the hook per stitch. Repeat it again for this space, so you have 3 loops in total.16. The next space to crochet into is where the hook is pointing. 17. Make 3 double crochet stitches half way through (by pulling through 2 loops only once) like before into each of the 5 spaces around, collecting 15 loops on the hook in total. 18. Yarn over and pull through all loops on the hook.19. Chain 3 and fasten off. 20. Hide your yarn tail in between the stitches from the last round. 21. These are some of the egg sizes I found around the house.22. And these egg covers fit them all!
I hope you enjoyed my last minute crochet Easter egg cover tutorial.