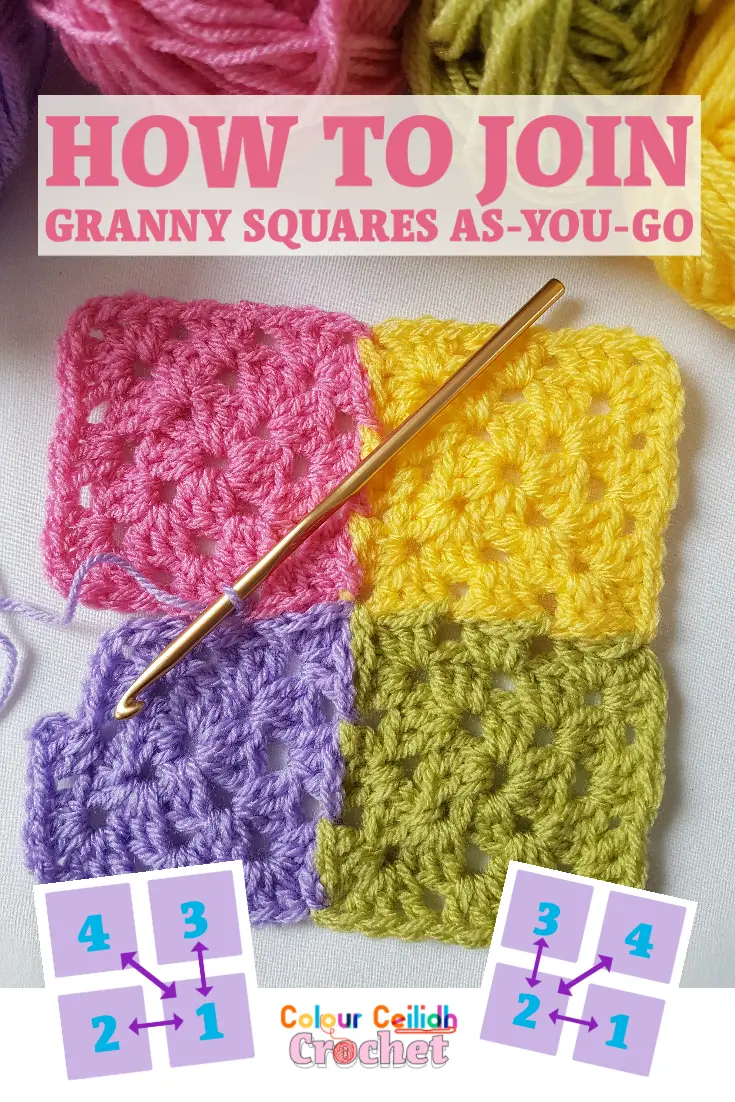
In this photo tutorial you’ll learn how to join granny squares as you go with a flat join method in crochet. This is my favourite way of joining granny squares as you go and it’s easier and prettier than the slip stitch join or the single crochet join in my opinion as it creates a smooth, braided look and it feels least confusing to me.
I created this tutorial for my favourite type of granny square, with a chain 1 in every corner and no chains in between the clusters.
I think this method is a great alternative to the join as you go continuous round, because you can join granny squares of different colors in the last round (like in this rectangular shawl) and you get to see your project grow with every motif.
And I think it’s nicer than sewing together or crocheting together when you’re done, because you don’t have a big pile of grannies to be dealt with, it’s seamless, and it probably uses less yarn!
Simple Principle
The principle of connecting granny squares with a flat join is very simple and can be described in 3 steps:
- When you are ready to join, remove the hook from your loop.
- Insert the hook front to back through the space you want to join with.
- Pull up the loose loop and chain 1*.
About The Chain 1
- *according to Edie Eckman’s book Connect The Shapes Crochet Motifs the flat join doesn’t necessarily include chaining one after you pull up the loop unless it’s a part of the pattern (as with a lot of grannies it is, chaining one between clusters). HOWEVER it looks so much better always securing the join with a chain 1. I chain 1 when I join as I go even when there is no chain 1 between my clusters in the pattern. Meaning, I would make my first granny with no chains between clusters except for in the corners and every time I would make subsequent grannies to join with the first one, after I pull up a loop through the space between clusters, I chain 1 to secure the join. What it does is it creates this gorgeous braided look for my projects and complements my favourite grannies (with a chain 1 in every corner but no chains in between the 3 dc clusters normally). The flat join just doesn’t look complete without the chain 1 to secure it in my opinion. The chain 1 makes it look neat and tidy and complements any project because it prevents the pulled up loop from stretching out too much and that chain 1 really enhances and improves the braided effect because it makes it look fuller. Chaining 1 is also more satisfying and fun to make!
How Do You Know When To Join?
You are ready to join your grannies together when you are crocheting your last round (or joining round), and you are about to start your third corner’s chain-1. So you’ve travelled around the square, you’ve completed your first two corners and there’s only one side to go. You’ve made your first 3 double crochet cluster into your corner and you have your hook at the ready.
You can start joining in any corner, but it’s easier to wait until most of the last round is done, since the other granny (and later the whole project as it gets bigger) might get in the way and pull on your hand (and thus affect the tension) while you’re trying to finish the round.
The Order Of Joining Granny Squares
If you’re making a granny square blanket and you’re joining as you go, it probably goes something like this:
- You make your first granny square.
- You join your second square to the side of the first one. And continue to join them in line until you reach the desired width.
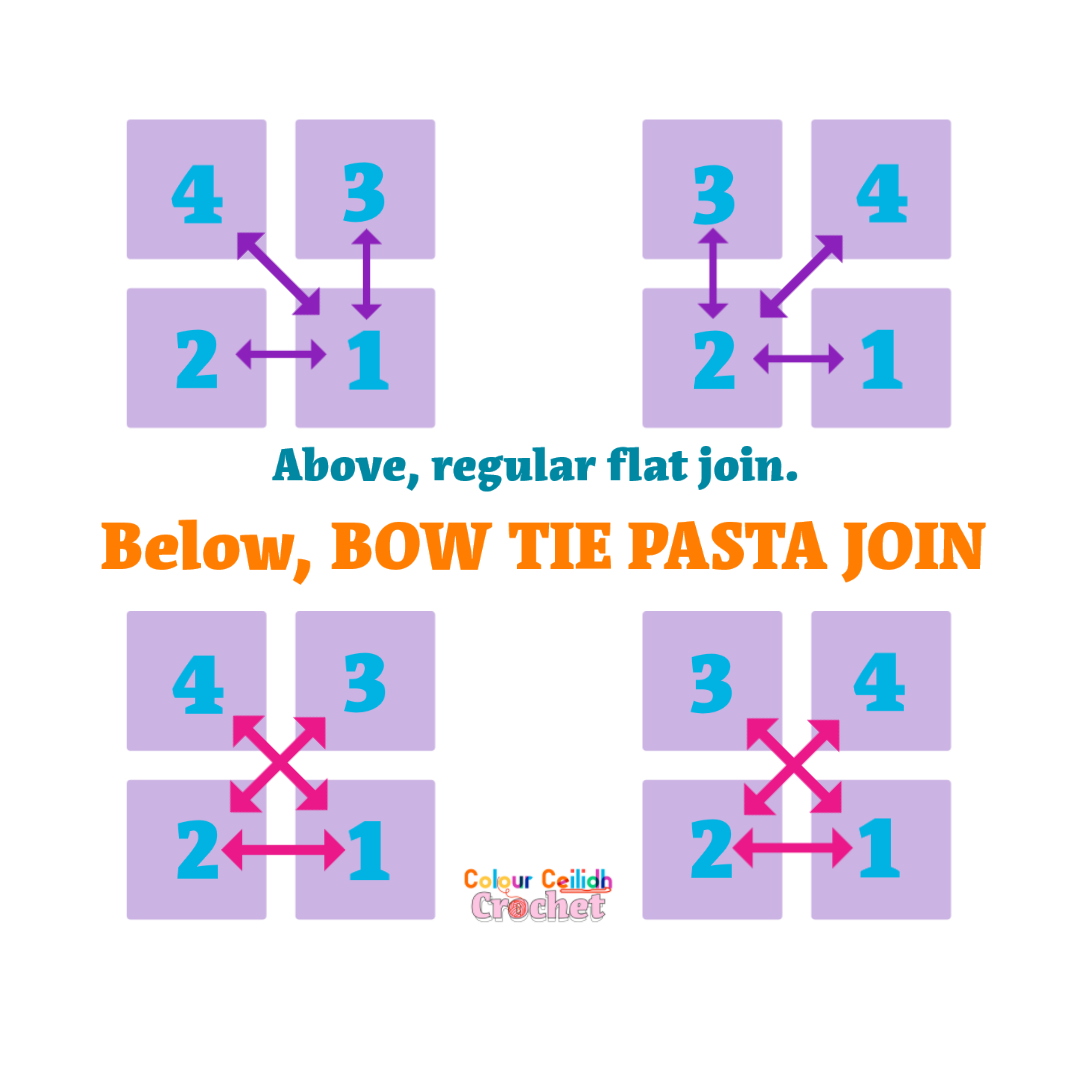
- You join subsequent squares on top of the others either coming from the right or from the left and you probably connect the first top square (square 3 in the diagram below) to the square directly below it.
- For every 2 x 2 granny square patch you probably connect the last square (square 4 in the diagram below) to the one below it that is diagonally opposite (you kind of have to, because otherwise you will leave large gaps).
For simplicity’s sake, let’s say your blanket is 2 by 2 granny squares. In the diagram below, it doesn’t matter if you join your 3rd granny from the left or from the right, the end result still looks pretty much the same (see Final Result in the tutorial below).
Bow Tie Pasta Join
But if you always join your top level grannies (3rd & 4th in the diagram) to the ones below that are diagonally opposite, you’ll get what I call the Bow Tie Pasta Effect In Crochet.
(So for the Bow Tie Pasta Join, if you want to try this method, resist the temptation to join square 3 to the one directly below it, and join it diagonally instead (pink arrows). Check out my How To Join Granny Squares – Bow Tie Pasta Join tutorial here and see what it looks like in crochet.)
How To Join Granny Squares
But for this tutorial, we are referring to the top section of the diagram above (purple arrows).
Here is my step by step photo tutorial for the crochet flat join as you go method.
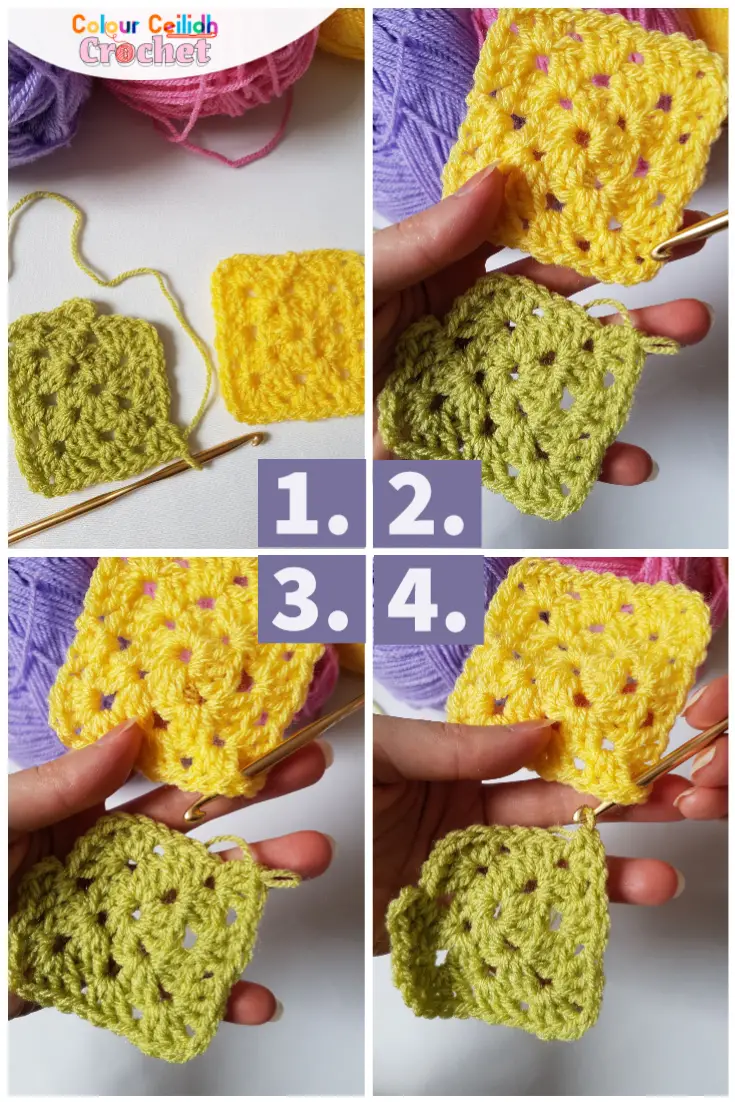
Joining The First Two Squares
- Begin your last round and crochet around until you have one side left. (This tutorial is for a granny square that has a ch-1 in the corners and no chains or a chain-1 in between the clusters. If you want to have an extra chain for every corner, decide if you want to place it before or after the joining chain 1.) Make your first 3 dc cluster and stop there.
- Remove your hook from the loop.
- Insert your hook front to back through the corner space of the other granny square you want to join with.
- Pick up the loose loop.
5. Pull the loop through the corner space.
6. Chain 1 to secure your join. Good job, you’ve joined the corners together!
7. Proceed to make your second granny cluster to complete the corner.
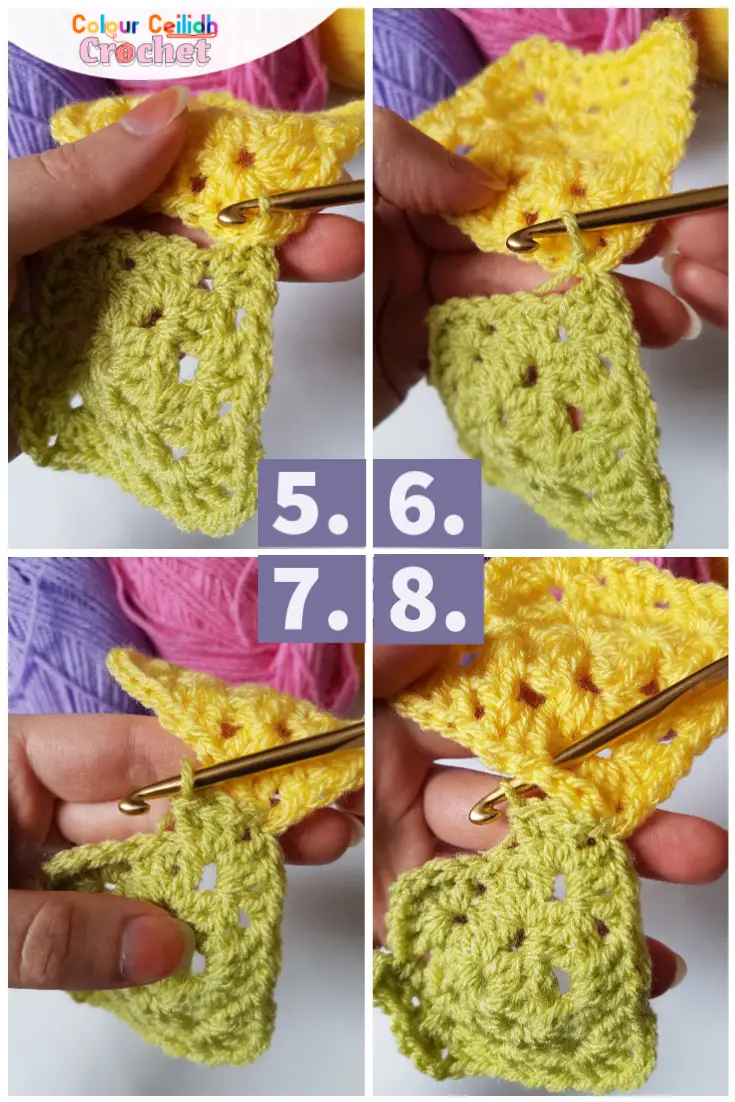
Now all the other steps are basically a repeat of what you’ve just learnt as the principle is simple, but I just wanted to show you a complete step-by-step with photos in case you needed more help.
8. Repeat the steps 2 – 4, so remove hook, insert hook front to back through the next space between clusters, pick up the loop.
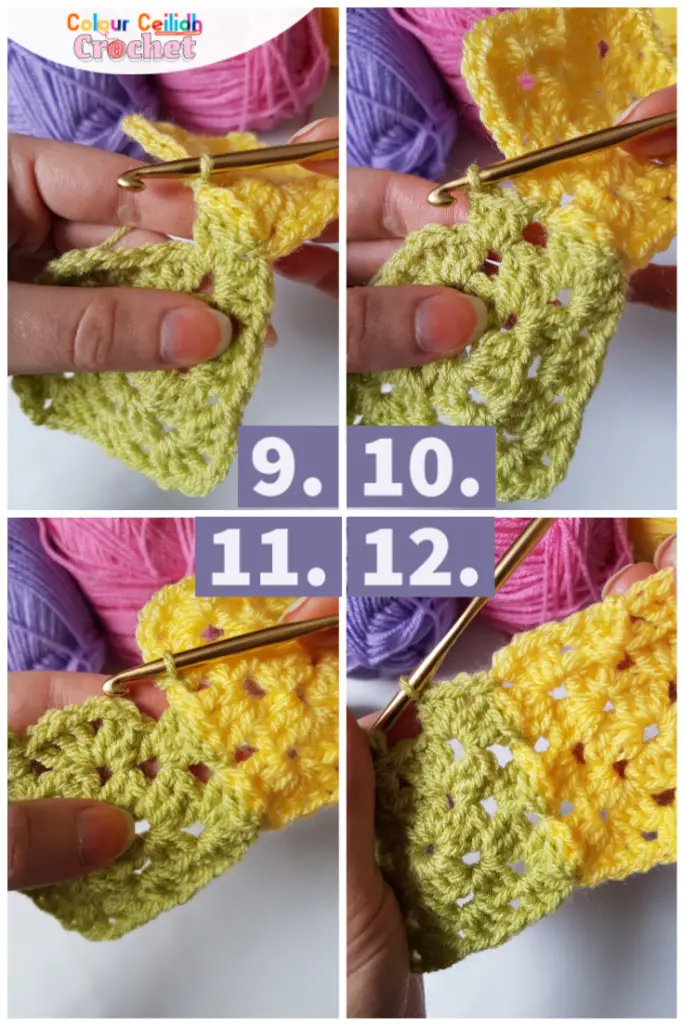
9. Pull the loop through the space between clusters and chain 1. If your next space is a corner, skip to Step 12.
10. Make another granny cluster into the next space between clusters.
11. Drop the loop, insert the hook front to back through the next space you want to join with, pick up the loop and chain 1. Continue until you reach a corner space.
12. For your corner space, crochet 3 dc, drop the loop, insert the hook front to back through the corner space of the other granny, pull up the loop, chain 1 and make another cluster of 3 dc into the same corner. Corner complete. End the round as usual. You’ve joined two squares!
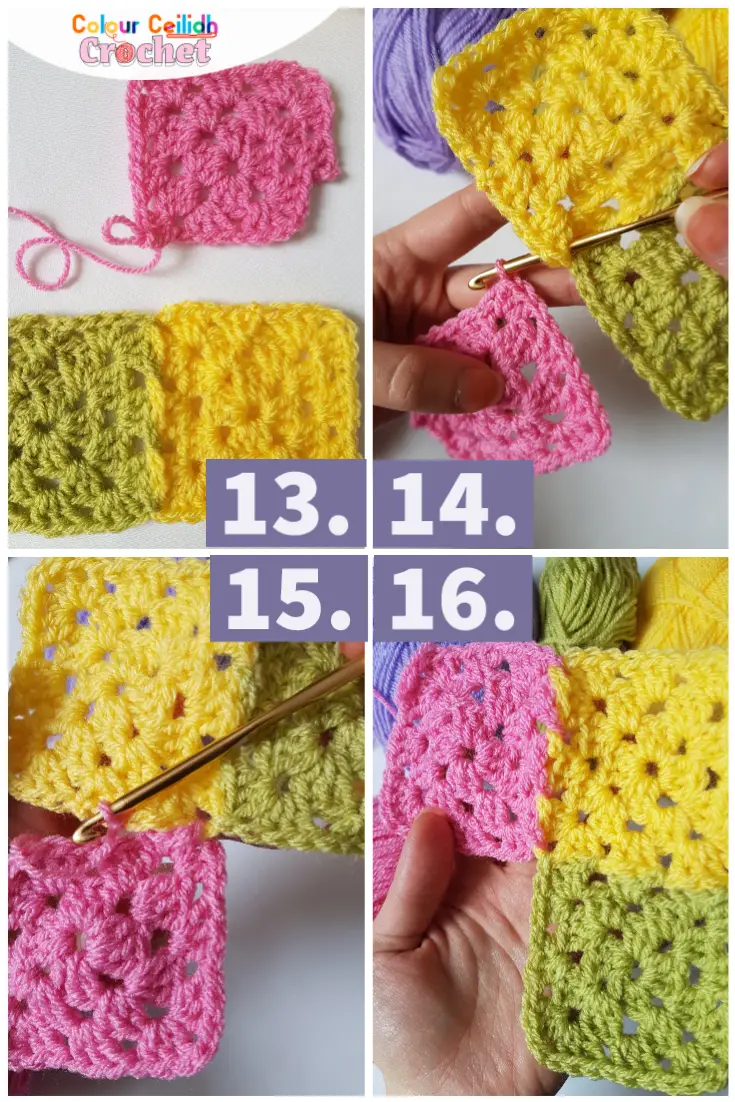
Squares 3 & 4 – Right To Left
- When it comes to your third square in this hypothetical 4-granny-square-blanket for simplicity’s sake, you have a choice to connect it starting from the left or the right side of the project.
- The steps below (13 – 21) show you how to connect your second row of granny squares starting from the right edge.
- The steps 22 – 24 show you how to connect your second row of granny squares starting from the left edge.
13. Make your third granny and like before, crochet your last round until you have one full uncompleted side left. Make your first 3 dc cluster into the corner and remove the hook.
14. Insert the hook front to back through the corner space of the granny directly below.
15. Pull up the loop, chain 1, and proceed to complete the last round.
16. I love the braided look of this method and how easy it is to remember!
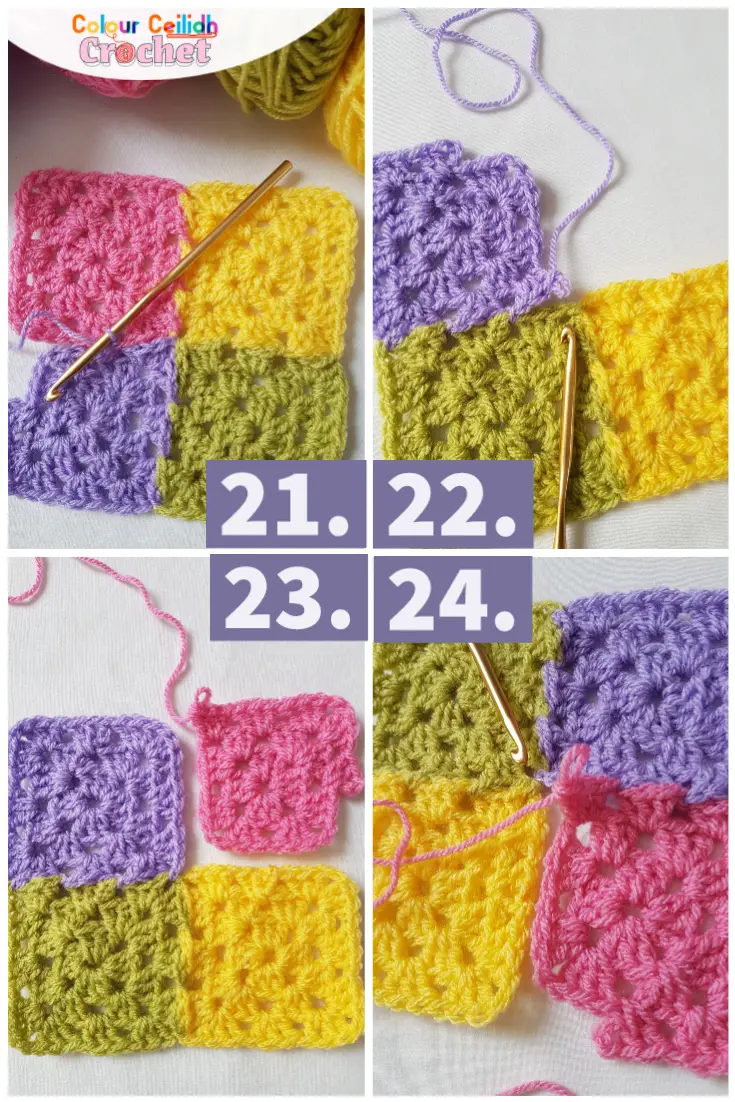
17. – 21. With the fourth square, leave two full sides undone in your last round, and when it comes to picking your corner space to join with, you kind of have to pick the one opposite (where the hook is pointing in step 20), because otherwise it won’t look right.
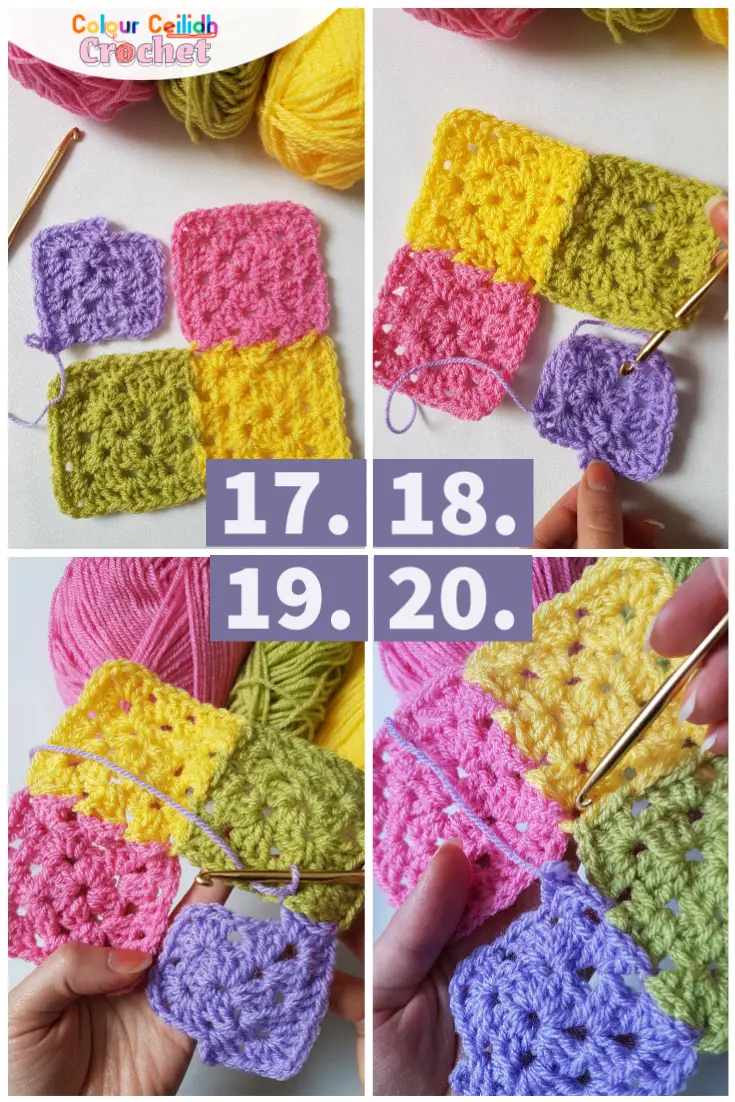
Squares 3 & 4 – Left To Right
22. Start connecting your third square and join with the corner space of the square directly below it, where the hook is pointing.
23. – 24. With the fourth square, leave two full sides undone in your last round, and when it comes to picking your corner space to join with, you kind of have to pick the one opposite (where the hook is pointing in step 24), because otherwise it won’t look right.
Final Result
The results are pretty much the same so it doesn’t matter whether you choose to start connecting your squares right to left or left to right (squares 3 & 4 in the diagram above).
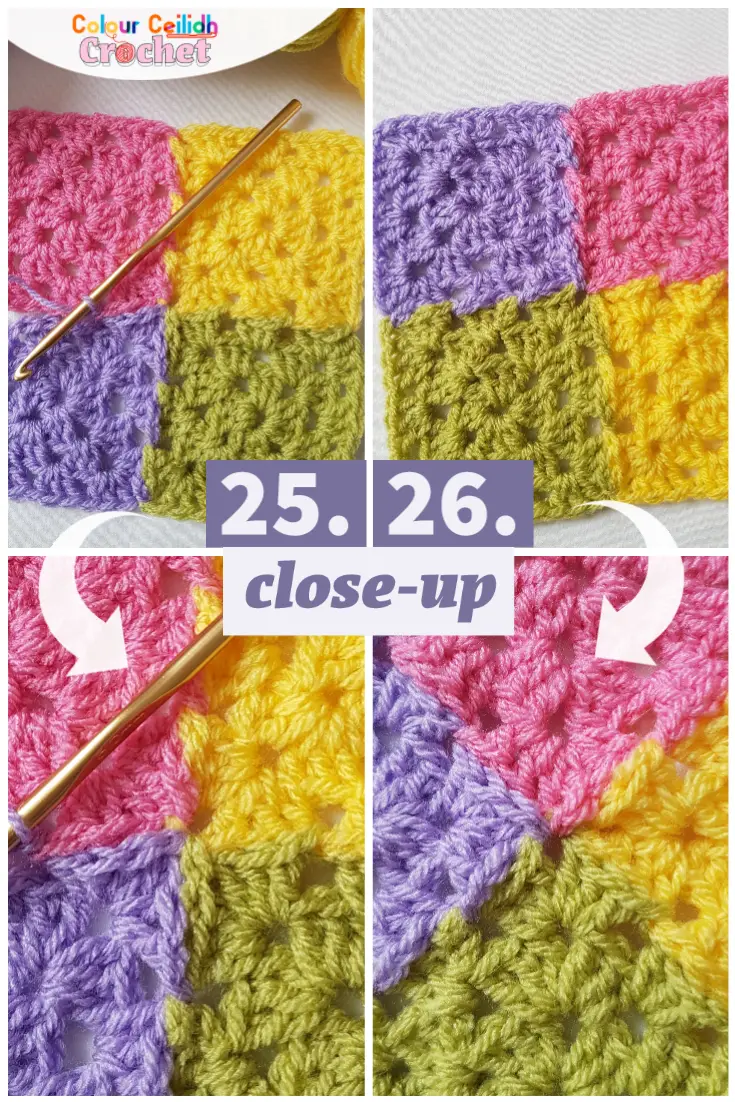
25. This is where we connected the second row of squares right to left, and the close up below.
26. This is where we connected the second row of squares left to right, and the close up below.
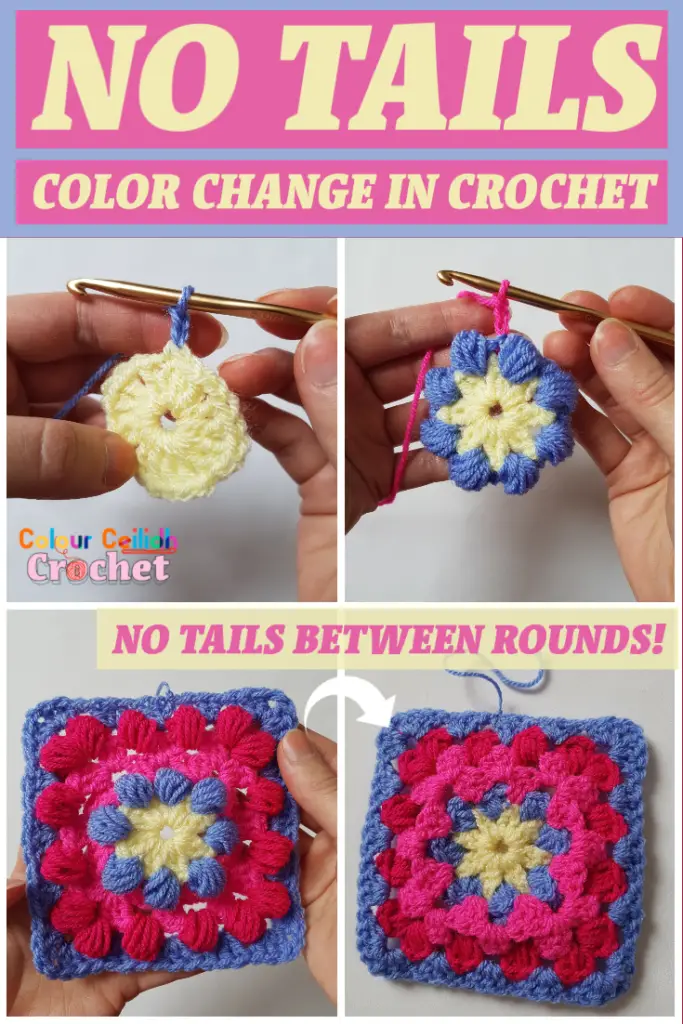
Crochet Color Change Help
By the way, there tends to be a lot of color change going on when crocheting granny squares. And as a result, a lot of yarn tails! I wanted to help you with this by creating the No Tails Color Change In Crochet method, check it out.
It promises that you will have no tails to weave in for color changes between rounds, rows or stripes, and that you will only have one tail for every motif.
More Granny Square Ideas
Here is a link to my entire list of blog posts that gets updated regularly involving the granny square with things like granny square scarf, granny blankets, tutorials, puff granny, granny square top, granny parcel tree decoration and just looking at the pictures you can get inspiration with different color combinations you can use for granny squares.
Well Done!
I really appreciate you visiting here, so a big thank you!
If you enjoyed this tutorial How To Join Granny Squares As You Go With A Flat Join, please share the link to this post with your friends, subscribe to my email list (the form pops up when you click around or come back again), Pin your favourite image by hovering over it and follow me on Pinterest so you never miss a pin, like my Facebook page and follow me on Instagram to see behind the scenes and for more color in your life.